


Quizmaker 360: Editing the Quiz Result Slide
Article Last Updated
This article applies to:
Each Quizmaker 360 quiz has a result slide, which gives learners feedback on their quiz attempts. In this tutorial, you’ll learn how to edit the result slide design and features.
Watch this video demo, then follow the activities below to practice.
Practice Activities:
- Set the Passing Score
- Open the Result Slide for Editing
- Add Content to the Success and Failure Layers
- Modify the Result Slide Options
- Replace the Result Slide with a Content Library 360 Template
Practice Activity: Set the Passing Score
If you’re working with a graded quiz, the first thing you’ll need to do is set your passing score.
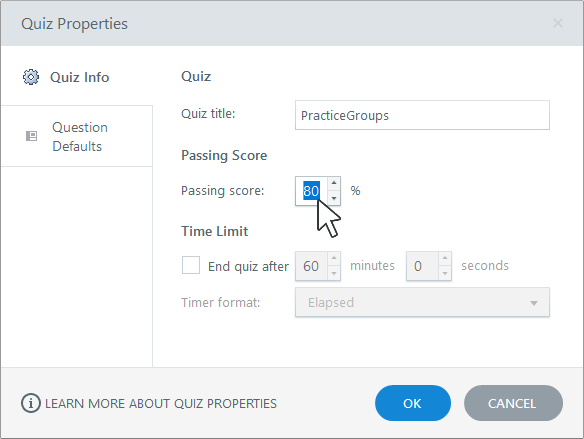
- Open PracticeGroups.quiz from your practice files.
- Go to the Home tab on the ribbon and click Quiz Properties.
- Select the Quiz Info tab on the left, then enter a percentage in the Passing score field.
- Click OK to close the Quiz Properties window.
To learn more about working with quiz properties, see this user guide.
Practice Activity: Open the Result Slide for Editing
In this activity, we’ll open the result slide and choose a result type.
- In Question List View, go to the Home tab on the ribbon and click Edit Result. The default result slide will open in Slide View where you can edit the design like any other slide in Quizmaker.
- Use the Result Slide Options panel on the right side of the screen to customize your quiz result slide.
For example, use the Result Type drop-down list to choose the type of result slide that’s best for your quiz. You can choose Graded, Survey (ungraded), or None. The default is Graded, which is what we’ll use for this tutorial.

Practice Activity: Add Content to the Base, Success, and Failure Layers
You can add any content to your result slide to convey the appropriate feedback, including text, images, characters, videos, audio, and web objects.
Base layer content will always show unless you specifically hide it on a feedback layer. But you can add different content to the success and failure layers to convey the appropriate feedback or provide follow-up instructions.
First, let’s add a background image to the base layer of the result slide.
- Select the base layer at the bottom of the Feedback Layers panel. It should be blank.
- Go to the Insert tab on the ribbon and click Picture.
- Select the mediaroom.jpg image in your practice files and click Open.
- Resize the image to fill the entire slide.
Next, let’s add a character to the success and failure layers.
- Select the Success layer in the Feedback Layers panel.
- Go to the Insert tab on the ribbon and click Character.
- Choose a character, expression, and pose that communicates success, then click Insert.
- Size and position the character where you want it on the feedback layer.
- Repeat steps 1-4 for the Failure feedback layer and insert a character that communicates disappointment.

Practice Activity: Modify the Result Slide Options
Quizmaker has several optional features for results slides, such as review, retry, and print buttons.
In this activity, we’ll enable different options for the the success and failure layers.
- Select the Success layer in the lower right corner of the screen.
- Enable the review and print results options.
- Disable the retry option.
- Switch to the Failure layer.
- Turn off the review and print results options.
- Enable the retry option and set the number of retries to 2.

To learn more about modifying result slide options, see this user guide.
Practice Activity: Replace the Result Slide with a Content Library 360 Template
Your Articulate 360 subscription includes Content Library 360 templates, which means you can import a beautifully-designed, ready-to-go result slide into your quiz. Let’s try it!
- Go to the Insert tab on the ribbon and click Replace Result.
- When the slide browser opens, select a result slide template and click Replace Result Slide.
- And if the colors don’t quite suit your needs, you can quickly change them by applying different theme colors or creating your own. Just go to the Design tab on the ribbon, click Colors, and choose a different theme.
It’s that easy!
Summary
In this tutorial, you learned how to edit the quiz result slide, including the result type, slide content, and optional features.
In the next tutorial, we’ll organize slides into question groups and randomize the questions in each group.