


Storyline 3: Accessible Text Styles
Article Last Updated
This article applies to:
Use text styles in Storyline 3 to make content easy to navigate with a screen reader. Styles identify text elements as headings, hyperlinks, blockquotes, and paragraphs. Storyline 3 publishes those details as semantic formatting in the source code for your course. Then screen readers announce the text and its semantic formatting to paint a mental picture of the content that sighted users get by looking at the screen.
For example, screen reader users might hear "prepare for your exam," and without semantic formatting, that's all they'd hear. They wouldn't know if the text was a heading, link, quote, or paragraph. However, if you apply a heading 1 style to the text in Storyline 3, screen reader users hear, "heading level 1 prepare for your exam," which gives learners important context.
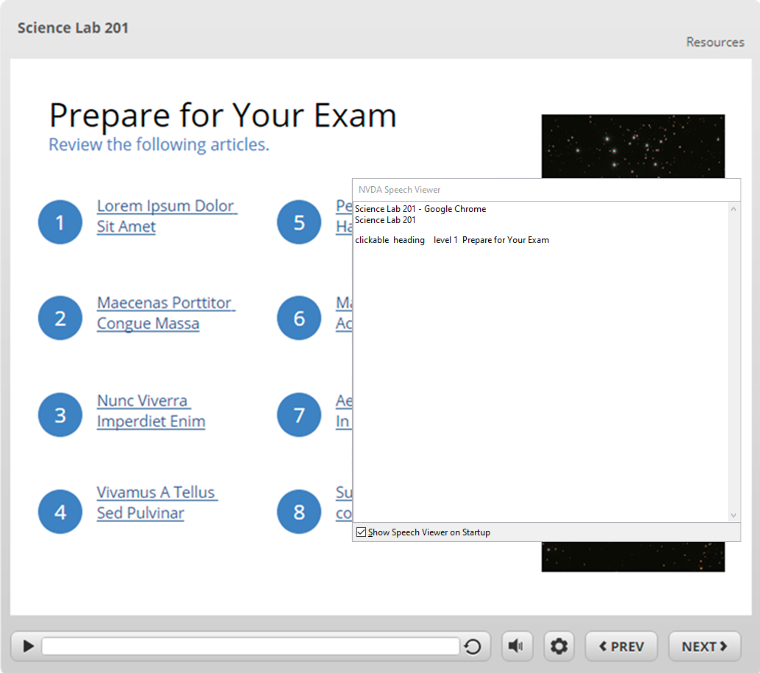
The NVDA speech viewer displays everything the screen reader announces, including semantic formatting.
Empowering Screen Reader Users
Starting with the April 2021 update, Storyline 3 automatically makes text styles accessible to assistive technologies, such as screen readers, by publishing semantic formatting (source code) for headings (<h>), links (<a>), blockquotes (<blockquote>), and paragraphs (<p>). This information is vital for screen reader users.
Plus, when you apply text styles to Storyline 3 projects, you empower learners to use built-in screen reader features to easily navigate headings, links, and quotes. Screen reader users can read straight through a page from beginning to end if they wish. However, according to WebAIM's screen reader surveys, most experienced screen reader users first explore headings and links to understand the layout of a page. Then they use screen reader shortcuts to jump directly to the content they want to read.
Text styles are valuable for authors and learners alike. Text styles give your course a consistent design, and they give screen reader users an equivalent experience to that of sighted users.
Author's Decisions
To give learners the best experience, you should always use text styles when creating a course. And you must use the modern text feature to make your text styles accessible. Storyline 3 does the rest of the work for you by building the semantic structure into your published output.
Text Styles
As an author, you should apply text styles to your entire project so all learners can identify headings, links, quotes, and paragraphs. For example, if you make some text bigger and bolder than other text, sighted learners can tell it's a heading. However, screen reader users won't know it's a heading unless you apply a heading style to it.
Modern Text
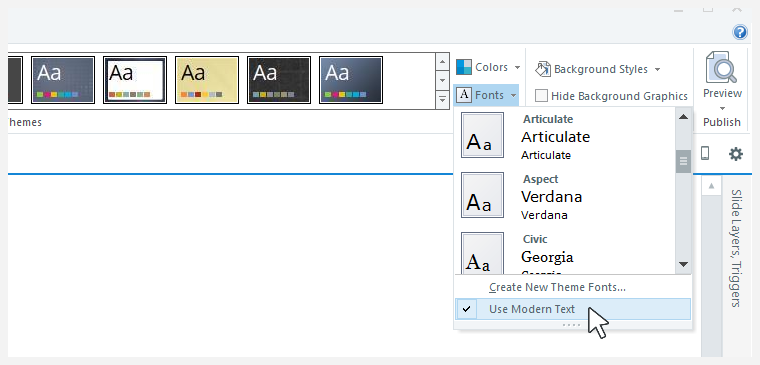
You must use modern text to make text styles accessible. Modern text is the default text-rendering engine for Storyline 3 projects, so you probably won't need to do any extra work. To confirm that a project has modern text, go to the Design tab on the ribbon, click Fonts, and make sure Use Modern Text is selected, as shown below.
Publishing
You don't need to do anything else to take advantage of accessible text styles. They're built right into your published output!
Learner's Choices
Learners can use screen readers and other assistive technologies to easily explore and navigate Storyline 3 content the same way they explore other websites. For example, screen reader users can tell how many headings and links are on the slide and jump directly to the ones they want. Below are some helpful screen reader shortcuts for navigating headings, links, and quotes.
List All Headings on the Slide
|
NVDA |
Insert+F7 to open the Elements List, then select Headings |
|
JAWS |
Insert+F6 |
|
VoiceOver (macOS) |
Control+Option+U to open the rotor, then use left/right arrows to select headings |
|
VoiceOver (iOS) |
Not available |
|
TalkBack |
Not available |
Jump to the Next Heading on the Slide
|
NVDA |
H |
|
JAWS |
H |
|
VoiceOver (macOS) |
Control+Option+Command+H |
|
VoiceOver (iOS) |
Twist two fingers on the screen to the left or right to open the rotor, then swipe down with one finger |
|
TalkBack |
Swipe up then right to open the local context menu (LCM), then select Headings |
Jump to the Next Heading Level on the Slide
|
NVDA |
1-4 |
|
JAWS |
1-4 |
|
VoiceOver (macOS) |
Not available |
|
VoiceOver (iOS) |
Not available |
|
TalkBack |
Not available |
List All Links on the Slide
|
NVDA |
Insert+F7 to open the Elements List, then select Links |
|
JAWS |
Insert+F7 |
|
VoiceOver (macOS) |
Control+Option+U to open the rotor, then use left/right arrows to select links |
|
VoiceOver (iOS) |
Not available |
|
TalkBack |
Not available |
Jump to the Next Link on the Slide
|
NVDA |
K |
|
JAWS |
Not available |
|
VoiceOver (macOS) |
Control+Option+Command+L |
|
VoiceOver (iOS) |
Twist two fingers on the screen to the left or right to open the rotor, then swipe down with one finger |
|
TalkBack |
Swipe up then right to open the local context menu (LCM), then select Links |
Jump to the Next Unvisited Link on the Slide
|
NVDA |
U |
|
JAWS |
U |
|
VoiceOver (macOS) |
Not available |
|
VoiceOver (iOS) |
Not available |
|
TalkBack |
Not available |
Jump to the Next Visited Link on the Slide
|
NVDA |
V |
|
JAWS |
V |
|
VoiceOver (macOS) |
Control+Option+Command+V |
|
VoiceOver (iOS) |
Not available |
|
TalkBack |
Not available |
Jump to the Next Quote on the Slide
|
NVDA |
Q |
|
JAWS |
Not available |
|
VoiceOver (macOS) |
Not available |
|
VoiceOver (iOS) |
Not available |
|
TalkBack |
Not available |