Storyline 3: How to Rotate an Interactive Dial More Than Once
Article Last Updated
This article applies to:
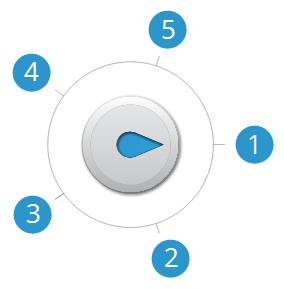
It’s easy to create a dial in Storyline 3 that makes one complete 360° rotation. But what if you want a dial that rotates more than once? You can do that, too!
There are five numbers you must enter for a dial to work:
- Rotation
- Start Value
- End Value
- Initial Value
- Step Value
This article explains what those five numbers should be to make a dial rotate more than once. And here’s a sample project file you can use to follow along. See the published example here.
- Set the Number of Rotations
- Set the Starting and Ending Values
- Set the Initial Value for the Dial Pointer
- Set the Step Value
- (Optional) Add Triggers to Restrict the Dial Variable to a Range of Values
Step 1: Set the Number of Rotations
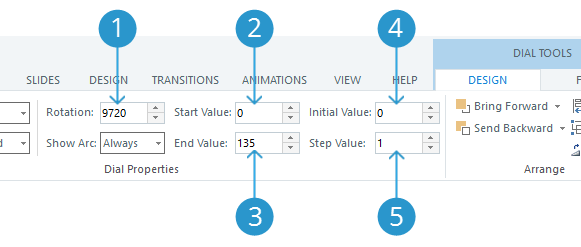
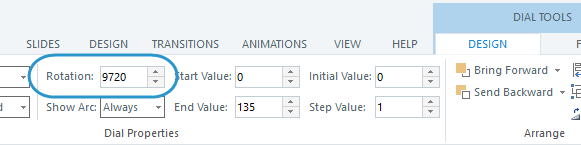
First, determine how many rotations your dial should make. Multiply the number of rotations by 360 and enter that value in the Rotation field. For example, 360° x 2 rotations = 720°.
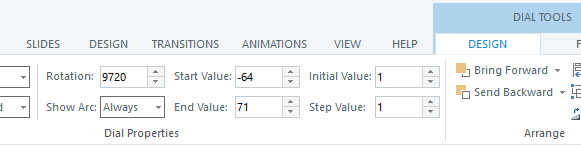
The maximum number of complete rotations for a dial is 27, so we recommend entering 9720° in the Rotation field if you want to simulate a dial that spins “infinitely.”
Step 2: Set the Starting and Ending Values
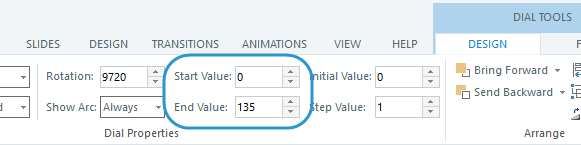
Next, decide how many steps you want per rotation, then multiply that by the number of rotations you chose in step 1 above.
For example, let’s say we want a dial with five steps per rotation and we want it to rotate 27 times (the max number of rotations), then our total number of steps is 5 x 27 = 135.
Now, enter 0 as the Start Value, and enter the total number of steps you just calculated as the End Value. Using the example above, you’d enter 135 as the End Value.
Tip:
The Start Value doesn’t have to be zero. You can use any start and end values you want as long as they equal the total number of steps you need. For example, you could use a Start Value of 1 and an End Value of 136 in the scenario above.
The sample project file uses a Start Value of -64 and an End Value of 71, which equals the 135 steps we need for our scenario. Why these values? So we can set the initial value for the dial pointer at 1, which is in the middle of the total range, and limit the dial variable to a small range of values from 1-5. More on that below.
Step 3: Set the Initial Value for the Dial Pointer
There are three options for the Initial Value as follows.
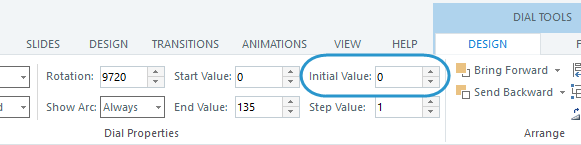
If you want the dial pointer to start at the beginning of the first rotation so you can initially only turn it clockwise, make the Initial Value equal to the Start Value.
If you want the dial pointer to start at the end of the last rotation so you can initially only turn it counter-clockwise, make the Initial Value equal to the End Value.
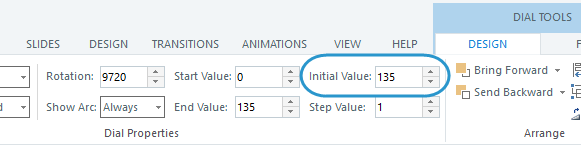
If you want the dial pointer to start somewhere in the middle so you can turn it either direction, set the Initial Value somewhere between your Start Value and End Value.

In the sample project file, we wanted the initial value to start in the middle of the range and we wanted it to be a value of 1, so we changed the Start Value to -64 and the End Value to 71 to accomplish that.

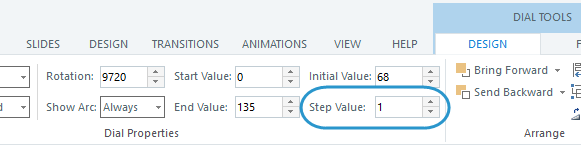
Step 4: Set the Step Value
The Step Value is the size of the jump between each stop along the dial’s rotation. For example, if you use a step value of 2, your dial will count steps as 2, 4, 6, etc. (or 1, 3, 5, etc., depending on the Start Value).
We recommend leaving the Step Value at 1. It keeps the calculations simple when setting up a dial that rotates more than once.
Step 5 (Optional): Add Triggers to Restrict the Dial Variable to a Range of Values
When a dial rotates more than once, it may technically travel through hundreds of steps even though it only makes a small number of stops on each individual rotation.
For example, in the scenario we’ve been following in this article, the dial makes 5 stops during each rotation.
But since it rotates 27 times, it actually makes 135 stops total. (See step 2 above for details.) That means the dial variable can have 135 values that we must take into account when triggering actions based on the dial value.
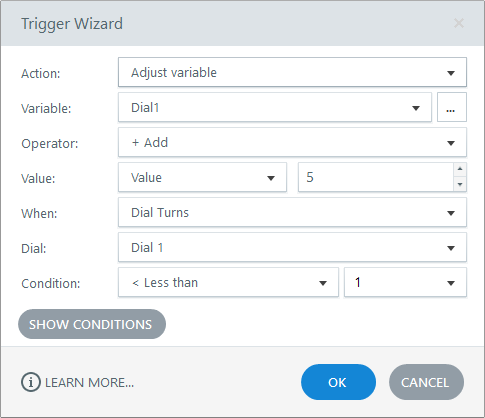
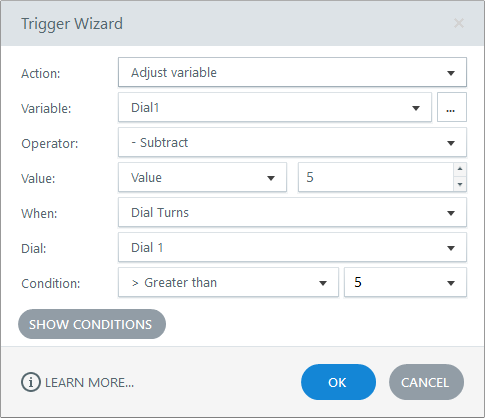
What if we want to limit the dial variable to a small range of values that simply repeat with each revolution? Say we only want to track five values in our scenario, no matter how many times you rotate the dial. No problem. Just add two triggers to act as upper and lower boundaries on the dial variable. Use the following parameters in the trigger wizard. (Download the sample project file to see it in action.)
Upper-Limit Trigger:
|
Action |
Adjust variable |
|
Variable |
(Select your dial variable from the list.) |
|
Operator |
Subtract |
|
Value |
Value; (Enter the max number of steps you want to track.) |
|
When |
Dial turns |
|
Dial |
(Select your dial from the drop-down list.) |
|
Condition |
Greater than; (Enter the highest value you want to track.) |
Lower-Limit Trigger:
|
Action |
Adjust variable |
|
Variable |
(Select your dial variable from the list.) |
|
Operator |
Add |
|
Value |
Value; (Enter the max number of steps you want to track.) |
|
When |
Dial turns |
|
Dial |
(Select your dial from the drop-down list.) |
|
Condition |
Less than; (Enter the lowest value you want to track.) |