


Storyline 360: Accessible Semantic Formatting
Article Last Updated
This article applies to:
People who use assistive technologies, such as screen readers, rely on a website's semantic formatting (source code) to paint a mental picture of the content that sighted users get by visually scanning the page. That requirement applies to e-learning courses too. Storyline 360 publishes courses with semantic formatting for headings, links, lists, and other elements so screen reader users can understand and explore content easily.
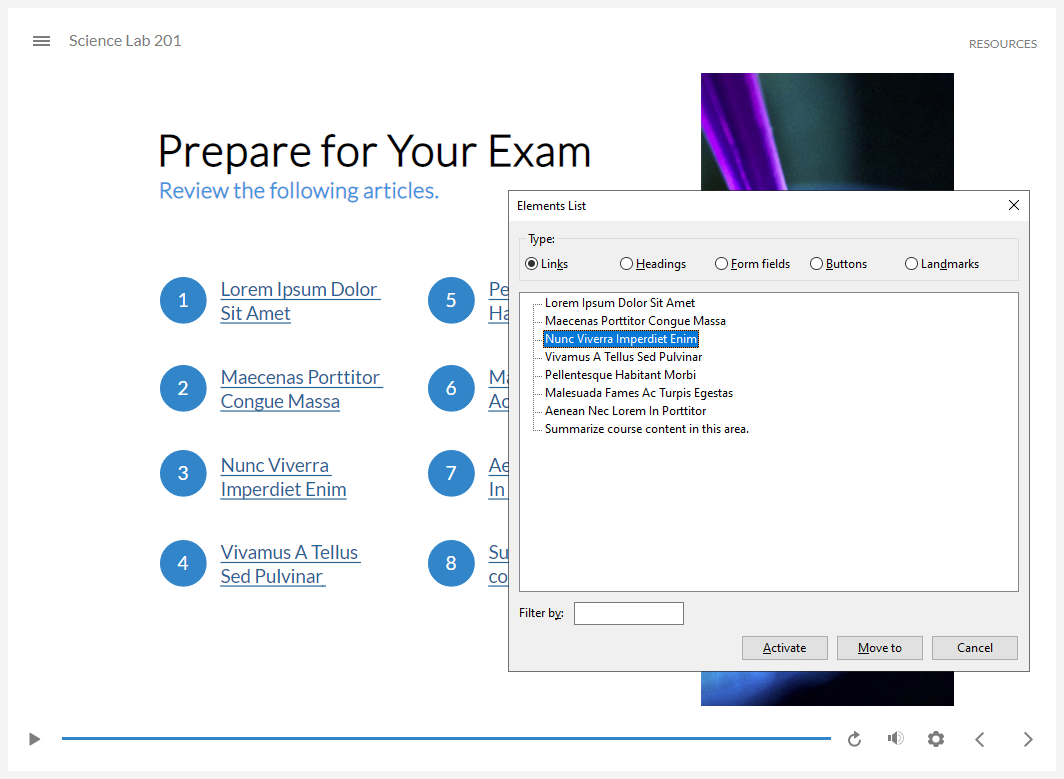
The elements list in the NVDA screen reader narrates all the links on the slide.
Empowering Screen Reader Users
Screen readers have always been able to read text in Storyline 360 courses, but Storyline 360 didn't always provide accessible semantic formatting to identify the text's layout and relationships. For example, in earlier builds of Storyline 360, screen readers couldn't differentiate between headings, paragraphs, and lists. This left screen reader users at a disadvantage. They heard the content but didn't get all the context.
Starting with the December 2020 update, Storyline 360 automatically publishes text with the correct semantic structure, empowering screen reader users to identify headings (<h>), links (<a>), lists (<ul>, <ol>, <li>), blockquotes (<blockquote>), paragraphs (<p>), etc. Plus, learners can use built-in screen reader features (like the elements list shown above) to easily navigate headings, links, lists, and other features in Storyline 360 courses. Now screen reader users enjoy an equivalent experience to that of sighted users.
Author's Decisions
To add accessible semantic formatting to a course, you must use modern text and should also consider using text styles. Storyline 360 does the rest of the work for you by building the semantic structure into your published output.
Modern Text
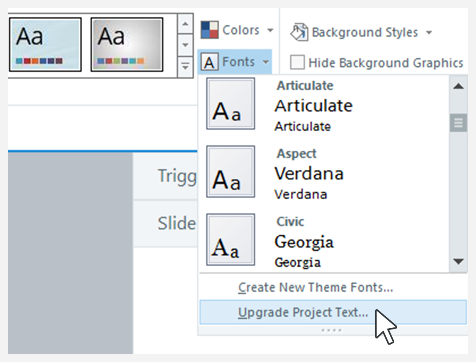
New Storyline 360 projects automatically use the latest text-rendering technology and provide accessible semantic formatting at the same time, so you probably won't need to do any extra work. To upgrade text in existing projects, go to the Design tab on the ribbon, click Fonts, and select Upgrade Project Text. This upgrades project text all at once and saves a backup copy of the project file with the original settings.
If you don't see the option to upgrade text but instead see an option to Display Accessible Text by Default, it means your project is already using modern text.
Text Styles
Although text styles aren't required, we recommend that you use them throughout your project, so sighted learners and screen readers users alike can identify headings, links, quotes, and paragraphs. For example, if you make a phrase bigger and bolder than other text, sighted learners can tell it's a heading. However, screen reader users won't know it's a heading unless you apply a heading style to it.
Publishing
You don't need to do anything else to take advantage of semantic formatting. It's automatically built into your published output!
Learner's Choices
Learners can use screen readers and other assistive technologies to easily explore and navigate Storyline 360 content the same way they explore other websites. For example, screen reader users can tell how many headings, links, and lists are on the slide and jump directly to the ones they want. Below are some helpful screen reader shortcuts for navigating headings, links, and lists.
List All Headings on the Slide
|
NVDA |
Insert+F7 to open the Elements List, then select Headings |
|
JAWS |
Insert+F6 |
|
VoiceOver (macOS) |
Control+Option+U to open the rotor, then use left/right arrows to select headings |
|
VoiceOver (iOS) |
Not available |
|
TalkBack |
Not available |
Jump to the Next Heading on the Slide
|
NVDA |
H |
|
JAWS |
H |
|
VoiceOver (macOS) |
Control+Option+Command+H |
|
VoiceOver (iOS) |
Twist two fingers on the screen to the left or right to open the rotor, then swipe down with one finger |
|
TalkBack |
Swipe up then right to open the local context menu (LCM), then select Headings |
Jump to the Next Heading Level on the Slide
|
NVDA |
1-4 |
|
JAWS |
1-4 |
|
VoiceOver (macOS) |
Not available |
|
VoiceOver (iOS) |
Not available |
|
TalkBack |
Not available |
List All Links on the Slide
|
NVDA |
Insert+F7 to open the Elements List, then select Links |
|
JAWS |
Insert+F7 |
|
VoiceOver (macOS) |
Control+Option+U to open the rotor, then use left/right arrows to select links |
|
VoiceOver (iOS) |
Not available |
|
TalkBack |
Not available |
Jump to the Next Link on the Slide
|
NVDA |
K |
|
JAWS |
Not available |
|
VoiceOver (macOS) |
Control+Option+Command+L |
|
VoiceOver (iOS) |
Twist two fingers on the screen to the left or right to open the rotor, then swipe down with one finger |
|
TalkBack |
Swipe up then right to open the local context menu (LCM), then select Links |
Jump to the Next Unvisited Link on the Slide
|
NVDA |
U |
|
JAWS |
U |
|
VoiceOver (macOS) |
Not available |
|
VoiceOver (iOS) |
Not available |
|
TalkBack |
Not available |
Jump to the Next Visited Link on the Slide
|
NVDA |
V |
|
JAWS |
V |
|
VoiceOver (macOS) |
Control+Option+Command+V |
|
VoiceOver (iOS) |
Not available |
|
TalkBack |
Not available |
Show All Lists on the Slide
|
NVDA |
Not available |
|
JAWS |
Insert+Ctrl+L |
|
VoiceOver (macOS) |
Not available |
|
VoiceOver (iOS) |
Not available |
|
TalkBack |
Not available |
Jump to the Next List on the Slide
|
NVDA |
L |
|
JAWS |
L |
|
VoiceOver (macOS) |
Control+Alt+Command+X |
|
VoiceOver (iOS) |
Twist two fingers on the screen to the left or right to open the rotor, select Lists, then swipe down with one finger Note: You may need to change your VoiceOver settings to access lists with this gesture. To change the settings, go to Settings > General > Accessibility > VoiceOver > Rotor. |
|
TalkBack |
Swipe up then right to open the local context menu (LCM), then select Lists |
Jump to the Next Item in the Current List
|
NVDA |
I |
|
JAWS |
I |
|
VoiceOver (macOS) |
Not available |
|
VoiceOver (iOS) |
Not available |
|
TalkBack |
Not available |