Storyline 360: How to Restrict or Lock Navigation
Article Last Updated
This article applies to:
We enhanced restricted and locked navigation in the July 11, 2017 update for Storyline 360. Be sure to update your software to take advantage of all the latest features and fixes.
When you restrict or lock navigation, you can choose whether it impacts just the menu or also disables the Previous and Next buttons on the player. And you can use triggers to override restricted navigation for individual slides. Jump to the following sections for details, depending on what you want to restrict or lock.
- Restrict or Lock Only the Menu
- Restrict or Lock the Menu and the Previous/Next Buttons for All Slides
- Restrict or Lock the Menu for All Slides and the Previous/Next Buttons for Some Slides
Restrict or Lock Only the Menu
You can restrict or lock menu navigation and still let learners use the Previous and Next buttons to move freely between slides as they wish. Here's how:
- Go to the Home tab on the Storyline ribbon and click Player.
- Click Menu on the player properties ribbon, then click the gear icon at the bottom of the window for additional menu options.
- Use the Navigation Restrictions drop-down list to choose either Restricted or Locked.
- Restricted means learners can view the current slide and any slide they previously viewed, but they can't jump ahead or skip over slides.
- Locked means learners can only view slides in the order you've designed. They can't jump ahead or skip over slides, nor can they go back to any previously viewed slides.
- Uncheck the box to Restrict Next/Previous buttons or Lock Next/Previous buttons, depending on the option you selected in the previous step.
- Click OK twice to close the menu options and the player properties.
Restrict or Lock the Menu and the Previous/Next Buttons for All Slides
You can easily restrict or lock all navigation for all slides. Here's how:
- Go to the Home tab on the Storyline ribbon and click Player.
- Click Menu on the player properties ribbon, then click the gear icon at the bottom of the window for additional menu options.
- Use the Navigation Restrictions drop-down list to choose either Restricted or Locked.
- Restricted means learners can view the current slide and any slide they previously viewed, but they can't jump ahead or skip over slides.
- Locked means learners can only view slides in the order you've designed. They can't jump ahead or skip over slides, nor can they go back to any previously viewed slides.
- Mark the box to Restrict Next/Previous buttons or Lock Next/Previous buttons, depending on the option you selected in the previous step. (It's marked by default.)
- Click OK twice to close the menu options and the player properties.
Restrict or Lock the Menu for All Slides and the Previous/Next Buttons for Some Slides
You can restrict or lock all navigation for all slides, and then use triggers to override the restricted or locked navigation for specific slides. First, restrict or lock the overall course. Here's how:
- Go to the Home tab on the Storyline ribbon and click Player.
- Click Menu on the player properties ribbon, then click the gear icon at the bottom of the window for additional menu options.
- Use the Navigation Restrictions drop-down list to choose either Restricted or Locked.
- Restricted means learners can view the current slide and any slide they previously viewed, but they can't jump ahead or skip over slides.
- Locked means learners can only view slides in the order you've designed. They can't jump ahead or skip over slides, nor can they go back to any previously viewed slides.
- Mark the box to Restrict Next/Previous buttons or Lock Next/Previous buttons, depending on the option you selected in the previous step. (It's marked by default.)
- Click OK twice to close the menu options and the player properties.
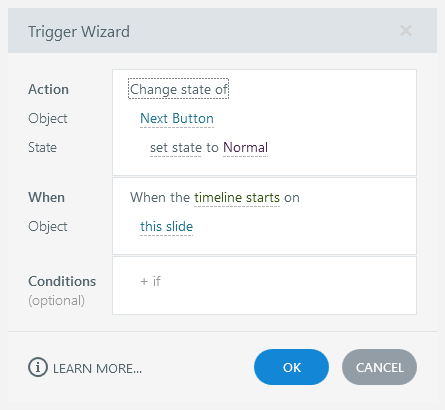
Then, add a trigger to each slide where you want to override the default settings. Since the Previous and Next buttons are disabled when navigation is restricted or locked, the trigger you create needs to change the state of the Previous or Next button to normal (i.e., enabled) when something happens. For example, here's how your trigger would look if you unlock the Next button when the timeline of the slide starts:
- Action: Change state of
- Object: Next Button
- State: Normal
- When: Timeline starts
- Object: This slide