


Storyline 360: Jump-to-Time Trigger
Article Last Updated
This article applies to:
Create unique interactions and give learners new ways to navigate by using triggers that jump to different times or cue points on the timeline. For example, you might give learners a list of topics covered in a video, and then use jump-to-time triggers to go directly to the point where each topic begins.
Create Jump-to-Time Triggers
Jump-to-time triggers are fun to use and easy to create. Follow these simple steps.
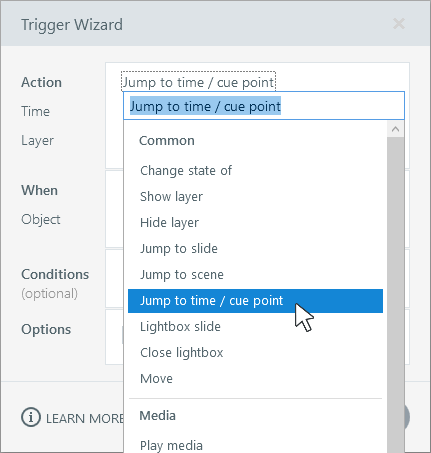
Step 1: Select the Action
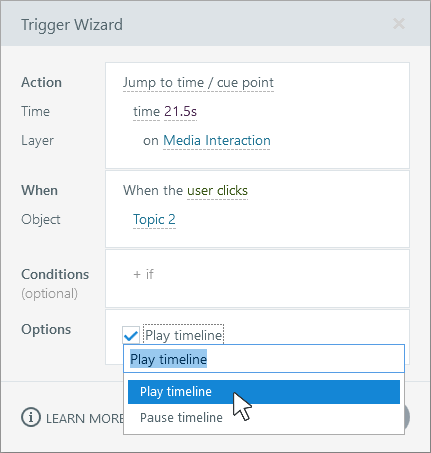
Create a new trigger and select the Jump to time / cue point action.
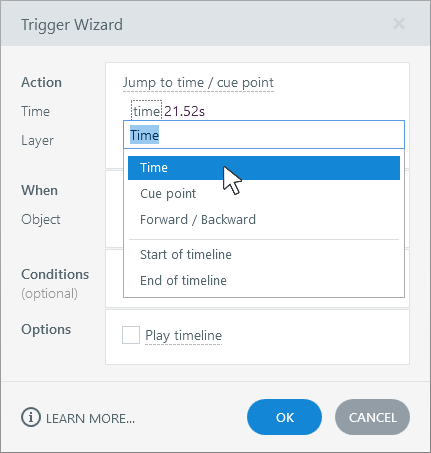
Step 2: Choose a Time
Decide where you want to jump. You can jump to:
- A specific timecode (e.g., 21.52 seconds)
- A cue point that you added to the timeline
- A specific number of seconds forward (e.g., +10) or backward (e.g., -10)
- The start of the timeline
- The end of the timeline
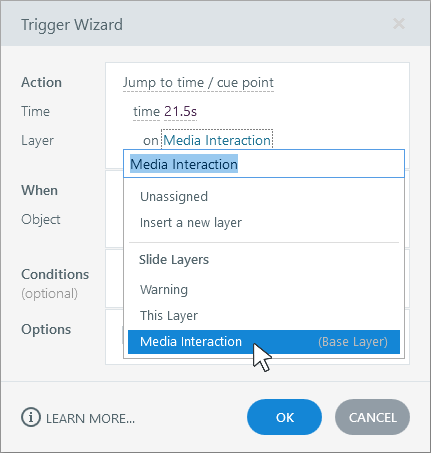
Step 3: Select a Layer
By default, the trigger controls the timeline of the current layer. However, you can control any visible layer on the slide.
Each layer has its own, independent timeline, so if you want to control more than one timeline simultaneously, you need to create a jump-to-time trigger for each layer.
Note that jump-to-time triggers can only affect visible layers. If you're targeting another layer, make sure it’s visible when the trigger fires.
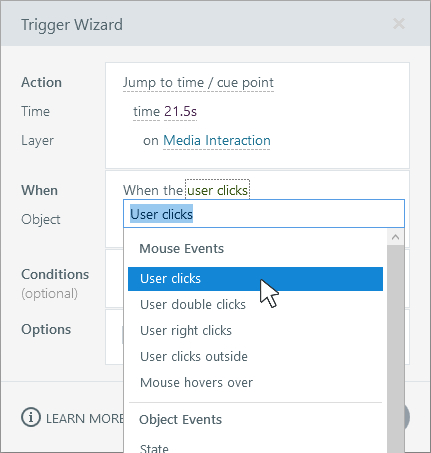
Step 4: Decide When the Trigger Fires
Choose the event that executes your jump-to-time trigger—for example, when the user clicks a button.
Step 5: Add Conditions (Optional)
If you only want the trigger to fire when certain criteria are met, add one or more conditions. For example, you might want the trigger to work only when a variable has a specific value or when an object has a specific state. Learn more about creating and managing trigger conditions.
Step 6: Play or Pause the Timeline (Optional)
Finally, decide what you want to happen to the timeline after jumping to the new position. You have three options.
|
If you want to … |
Do this … |
|
Allow the timeline to maintain its current state—either continue playing or remain paused |
Don’t mark the optional check box. |
|
Force the timeline to play |
Mark the optional check box and select Play timeline. |
|
Force the timeline to pause |
Mark the optional check box and select Pause timeline. |
Test a Sample Interaction
Want to see jump-to-time triggers in action? Check out this example. It uses triggers to jump to topic bookmarks in a video. There are also custom buttons that jump backward and forward 10 seconds at a time.
If you'd like to explore the project file to see how the triggers are set up, click the download link in the upper right corner of the interaction.

Pro Tip: There’s a hotspot covering the video to keep it synchronized with the seekbar.