


Storyline 360: Object Editing Enhancements
Article Last Updated
This article applies to:
It's easier than ever to size and position objects with pixel-perfect precision in Storyline 360. Design beautiful courses quickly with the following workflow improvements. Watch this video demonstration, then check out the details below.
- Edit Objects Quickly and Precisely with New Visual Cues
- Fine-Tune Object Placement with Expanded Ribbon Controls
- Align Objects Easily with More Snap Points
- Design Perfect Slides with Enhanced Grid, Guides, and Rulers
- Work Faster with Updated Keyboard Shortcuts
- Edit Multiple Objects at the Same Time
- Edit Grouped Objects Predictably
Edit Objects Quickly and Precisely with New Visual Cues
As you resize, move, and rotate objects, you’ll get new visual cues that dynamically update with the exact dimensions, coordinates, and rotation values of your objects.
|
Width x Height |
X, Y Coordinates |
Degree of Rotation |
 |
 |
 |
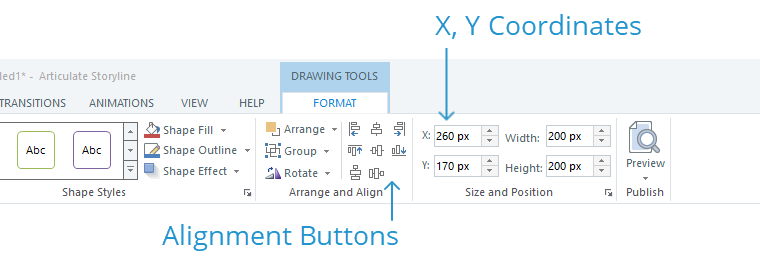
Fine-Tune Object Placement with Expanded Ribbon Controls
The X and Y coordinates for a selected object now appear on the Storyline ribbon so you can reposition it quickly and precisely without having to open the Size and Position window.
And the alignment buttons are now exposed on the ribbon for quicker access.
Align Objects Easily with More Snap Points
There are more snap points when you’re creating new objects and editing existing objects. And snap points are brighter and easier to see. As a result, it’s much easier to align objects with other slide elements.

Design Perfect Slides with Enhanced Grid, Guides, and Rulers
The grid, guides, and rulers are now even more helpful for designing perfect slides.
Grid
Objects no longer snap to the grid by default, which gives you more precision when nudging objects. Arrow keys now nudge objects 1 px at a time by default.
You can still snap objects to the grid if you’d prefer. Just go to the View tab on the ribbon, click Grid and Guides, and mark the box to Snap objects to grid.
Guides
There are now four guidelines by default rather than two. And it’s easier than ever to create more guidelines. Use any of these methods:
- Double-click a ruler to create a new guideline at that point.
- Click a ruler and drag away from it to create a new guideline.
- Right-click the slide where you want a new guideline to appear, then choose one of the guideline options.
- Press the Ctrl key as you drag an existing guideline to create a new one.
Guidelines are also selectable, so you have more control when positioning them on your slide. Just click a guideline to select it. It’ll turn blue. Then use your arrow keys to nudge it.
And you can lock guides in place so you don’t accidentally move them. Go to the View tab on the ribbon, click Grid and Guides, and mark the box to Lock guides.
Rulers
The rulers now measure pixels rather than inches, so it’s much easier to calculate where guidelines and slide objects should be placed.
And you can now use the rulers to create new guidelines. Simply double-click a ruler or click and drag away from a ruler. See the section above for details.
Work Faster with Updated Keyboard Shortcuts
These keyboard shortcuts are more powerful and predictable when editing objects.
|
Shift+Drag |
The Shift key now constrains an operation whether you press it before or after you begin dragging an object, a sizing handle, or a rotation handle. For example, you can drag a line to lengthen it, then press the Shift key to prevent it from rotating as you resize it. Or, you can drag an object to move it, then press the Shift key to force it to move only in a straight horizontal or vertical path. |
|
Ctrl+Shift+Drag |
This duplicates the selected object and moves it in a straight horizontal or vertical path. |
|
Ctrl+Arrow |
This moves the selected object. If the snap-to-grid feature is turned off (the default setting), then Ctrl+Arrow nudges the object by the number of pixels in your grid settings. The default is 8 px. If the snap-to-grid feature is turned on, then Ctrl+Arrow nudges the object 1 px at a time. |
|
Ctrol+Shift+Arrow |
This resizes the selected object. If the snap-to-grid feature is turned off (the default setting), then Ctrl+Shift+Arrow adjusts the width or height of the object by the number of pixels in your grid settings. The default is 8 px. If the snap-to-grid feature is turned on, then Ctrl+Shift+Arrow adjusts the width or height of the object 1 px at a time. |
|
Ctrl+Shift+D |
When you copy and paste an object, it may be offset a few pixels down and to the right of the original object. Now you can press Ctrl+Shift+D when you need to paste a copy in the same place as the original object. |
Edit Multiple Objects at the Same Time
Editing multiple objects at the same time is faster and more intuitive. For example, you can multi-select several objects, enter X and Y coordinates on the ribbon, and the selected objects will move to the same position on the slide simultaneously.
Edit Grouped Objects Predictably
We made several improvements to grouped objects so they’re easier to edit.
- Objects in a group scale proportionately when resizing the group.
- Objects in a group snap to guides and other objects the same way they do when they’re not grouped.
- Objects in a group can be moved individually without affecting the position of other objects in the group.
- When a grouped object is rotated and then ungrouped, the ungrouped objects keep the same rotation that the grouped object had.
- Undoing and redoing actions on grouped objects is predictable and consistent.